添加一个新的机型
PX4使用存储的配置作为机型的起始点。 机体的配置在ROMFS/px4fmu_common/init.d文件夹下的配置文件中定义。 配置文件中引用了用于描述机体物理结构的混控文件,该类文件存储在ROMFS/px4fmu_common/mixers文件夹下。
添加配置是非常简单的:在 init.d 文件夹下创建一个新的文件(使用未使用的 autostart ID 作为文件名的前缀),然后构建并上传固件即可。
如果不想创建自己的配置文件,也可以用SD卡上的文本文件替换掉已有的自定义配置文件,具体细节请查看自定义系统启动页。
配置文件概述
配置和混控文件中的机型配置包括如下几个主要模块:
- 机架说明文档(被Airframes Reference和QGroundControl) 使用。
- 飞机特定的参数设置,包括参数整定增益。
- 应该启动的应用,例如多旋翼或者固定翼的控制器,着陆检测等等。
- 系统(固定翼,飞翼或者多旋翼)的物理配置。 在这里我们称之为 混控器。
上述几个模块在很大程度上都是相互独立的,这就意味着很多配置共用同一套机架的物理结构、启动同样的应用,仅在参数整定增益上有较大区别。
新的机型配置文件仅在执行干净的构建后(运行命令
make clean)才会被自动添加到构建系统中。
配置文件
A typical configuration file is shown below (original file here).
第一部分是关于机身框架的文档说明。 Airframes Reference 和 QGroundControl 会用到该部分内容。
#!nsh
#
# @name Wing Wing (aka Z-84) Flying Wing
#
# @url https://docs.px4.io/en/framebuild_plane/wing_wing_z84.html
#
# @type Flying Wing
# @class Plane
#
# @output MAIN1 left aileron
# @output MAIN2 right aileron
# @output MAIN4 throttle
#
# @output AUX1 feed-through of RC AUX1 channel
# @output AUX2 feed-through of RC AUX2 channel
# @output AUX3 feed-through of RC AUX3 channel
#
# @maintainer Lorenz Meier <lorenz@px4.io>
#
接下来的一部分指定飞机特定的参数,包括调整增益:
sh /etc/init.d/rc.fw_defaults

if [ $AUTOCNF == yes ]
then
  param set BAT_N_CELLS 2
  param set FW_AIRSPD_MAX 15
  param set FW_AIRSPD_MIN 10
  param set FW_AIRSPD_TRIM 13
  param set FW_R_TC 0.3
  param set FW_P_TC 0.3
  param set FW_L1_DAMPING 0.74
  param set FW_L1_PERIOD 16
  param set FW_LND_ANG 15
  param set FW_LND_FLALT 5
  param set FW_LND_HHDIST 15
  param set FW_LND_HVIRT 13
  param set FW_LND_TLALT 5
  param set FW_THR_LND_MAX 0
  param set FW_PR_FF 0.35
  param set FW_RR_FF 0.6
  param set FW_RR_P 0.04
fi
设置机身框架类型(MAV_TYPE)
# 配置此为固定翼
set MAV_TYPE 1
设置需要使用的混控器:
# 设定混控
set MIXER wingwing
配置PWM输出(指定驱动/激活的输出和级别)。
# 向 ESC 提供一个常值 1000 us 脉冲
set PWM_OUT 4
set PWM_DISARMED 1000
:如果你想将某一个通道反相, 千万不要在你的遥控器上这样做或者改变例如
RC1_REV这样的参数. 这些参数只会在你使用手动模式飞行的时候才会反相, 当你切换到飞控控制的飞行模式时, 这些通道输出依然是错误的(它只会改变你的遥控器的信号) 因此,对于一个正确的通道分配,要么改变PWM信号与PWM_MAIN_REV1(例如,对于通道1),要么改变相应混控器的输出缩放系数(见下文)。
混控器文件
你应首先阅读 概念 > 混控器 页面, 该页面中的内容提供了理解如下混控器文件所需的背景知识。
下面展示了一个典型的混控器文件(原始文件在这里)。 混控器文件的文件名,在这里的案例中也就是 wingwing.main.mix,向我们提供了包括机型类型(wingwing),输出类型(.main 或者 .aux)和它是一个混控器定义文件(.mix)这三个重要信息。
混频器文件包含多个代码块,每个代码块都针对一个执行器或电调。 因此,如果你有两个执行器和一个 ESC,那么你的混控器文件应该包含三个代码块。
舵机 / 电机应按照混控器文件中的定义顺序对应地接入飞控。
所以 MAIN1 应为左副翼,MAIN2 应为为右副翼 ,MAIN3 为空 (这里需要注意的是 Z: 表示混控器为空),MAIN4 为油门(在常规固定翼机型配置中应保持油门在 4 号输出位置上)。
混控器以 -10000 到 10000 这一范围进行单位化编码,其分别对应于 -1.. + 1。
M: 2
O:      10000  10000      0 -10000  10000
S: 0 0  -6000  -6000      0 -10000  10000
S: 0 1   6500   6500      0 -10000  10000
上述定义中从左到右每一个数字所代表的意思是:
- M: 数字 2 表示该输出通道对应两个控制输入, 该参数表示混控器将接受到的控制输入的数量。
- O: Indicates the output scaling (1 in negative, 1 in positive), offset (zero here), and output range (-1..+1 here).
- If you want to invert your PWM signal, the signs of the output scalings have to be changed:
O: -10000 -10000 0 -10000 10000 - 如果这一行设定的是如下默认值,那么我们也可以(也应该)完全省略这一行:
O: 10000 10000 0 -10000 10000
- If you want to invert your PWM signal, the signs of the output scalings have to be changed:
- S:表示第一个输入的缩放器:它取控制组 #0 (Flight Control) 的第一个控制量(滚转)作为输入。 它将滚转控制输入 * 0.6 进行缩放并反转输入量的正负号(-0.6 在缩放后的单位中变成了 -6000)。 该混控器不施加任何偏移量(0)且输出量幅值在 (-1.. +1)这个范围内。
- S:表示第二个输入的缩放器:它取控制组 #0 (Flight Control) 的第二个控制量(俯仰)作为输入。 \ It scales the pitch control input * 0.65. 不施加任何偏移量(0)并且输出量的幅值在 (-1.. +1)这个范围内。
In short, the output of this mixer would be SERVO = ( (roll input * -0.6 + 0) * 1 + (pitch input * 0.65 + 0) * 1 ) * 1 + 0
程序后台会对两个缩放器的值进行求和,这就意味着对于这个飞翼来说该控制舵面最大从滚转信号中取 60% 的舵面偏转、从俯仰信号中最大取 65% 的舵面偏转。
完整的混控器如下所示:
Delta-wing mixer for PX4FMU
===========================

Designed for Wing Wing Z-84

This file defines mixers suitable for controlling a delta wing aircraft using
PX4FMU. The configuration assumes the elevon servos are connected to PX4FMU
servo outputs 0 and 1 and the motor speed control to output 3. Output 2 is
assumed to be unused.

Inputs to the mixer come from channel group 0 (vehicle attitude), channels 0
(roll), 1 (pitch) and 3 (thrust).

See the README for more information on the scaler format.

Elevon mixers
-------------
Three scalers total (output, roll, pitch).

The scaling factor for roll inputs is adjusted to implement differential travel
for the elevons.

This first block of code is for Servo 0...

M: 2
O:      10000  10000      0 -10000  10000
S: 0 0  -6000  -6000      0 -10000  10000
S: 0 1   6500   6500      0 -10000  10000

And this is for Servo 1...

M: 2
O:      10000  10000      0 -10000  10000
S: 0 0  -6000  -6000      0 -10000  10000
S: 0 1  -6500  -6500      0 -10000  10000

Note that in principle, you could implement left/right wing asymmetric mixing, but in general the two blocks of code will be numerically equal, and just differ by the sign of the third line (S: 0 1), since to roll the plane, the two ailerons must move in OPPOSITE directions.
The signs of the second lines (S: 0 0) are indentical, since to pitch the plane, both servos need to move in the SAME direction.

Output 2
--------
This mixer is empty.

Z:

Motor speed mixer
-----------------
Two scalers total (output, thrust).

This mixer generates a full-range output (-1 to 1) from an input in the (0 - 1)
range.  Inputs below zero are treated as zero.

M: 1
O:      10000  10000      0 -10000  10000
S: 0 3      0  20000 -10000 -10000  10000
增加一个新的机型组(Airframe Group)
机型 "组" 用于对相似的机型进行分组,以方便在 QGroundControl 中进行选取,同时方便在 Airframe Reference 中进行文档记录(PX4 DevGuide 和 PX4 UserGuide 文档)。 每个组都有一个名称和与之相关联的 svg 图像,该图像展示了该分组内的机型的通用几何形状、电机数量和电机旋转方向。
使用编译指令 make airframe_metadata 可以运行脚本自动根据机型描述语句生成需要在 QGroundControl 中使用的机型元数据文件和文档源代码。
如果新机型属于现有某一个分组,那么你只需要在向位于 ROMFS/px4fmu_common/init.d 文件夹下的机型描述文件中提供相关文档即可。
如果机型属于一个 新的组 那么你还需要进行如下操作:
- 向文档仓库添加该机型组的 svg 图像文件(如果未添加图像文件则会显示一个占位符图像):
- PX4 开发指南: assets/airframes/types
- PX4 用户指南: assets/airframes/types
在 srcparser.py 文件的
GetImageName()中添加机型组名称与图像文件名的映射关系(遵循如下模式): def GetImageName(self):""" Get parameter group image base name (w/o extension) """ if (self.name == "Standard Plane"): return "Plane" elif (self.name == "Flying Wing"): return "FlyingWing" ......
return "AirframeUnknown"更新 QGroundControl:
- 将该机型组的 svg 图像文件添加至: src/AutopilotPlugins/Common/images
Add reference to the svg image into qgcimages.qrc, following the pattern below:
   ...
   <file alias="Airframe/AirframeSimulation">src/AutoPilotPlugins/Common/Images/AirframeSimulation.svg</file>
   <file alias="Airframe/AirframeUnknown">src/AutoPilotPlugins/Common/Images/AirframeUnknown.svg</file>
   <file alias="Airframe/Boat">src/AutoPilotPlugins/Common/Images/Boat.svg</file>
   <file alias="Airframe/FlyingWing">src/AutoPilotPlugins/Common/Images/FlyingWing.svg</file>
   ... >
Note 剩下的机型元数据会自动包含在固件中(只要 srcparser.py 完成了更新)。
调参
下面的 PX4 User Guide 话题解释了如何对那些需要在配置文件中明确的参数进行调整:
将新的机型加入到 QGroundControl
为了令一个新的机型可以在 QGroundControl 软件的 airframe configuration 页面中可用,你应进行如下操作:
- 创建一个干净的生成(例如,先运行
make clean指令,然后再运行make px4_fmu-v5_default) 打开 QGC 然后如下图所示单击 Custom firmware file...:
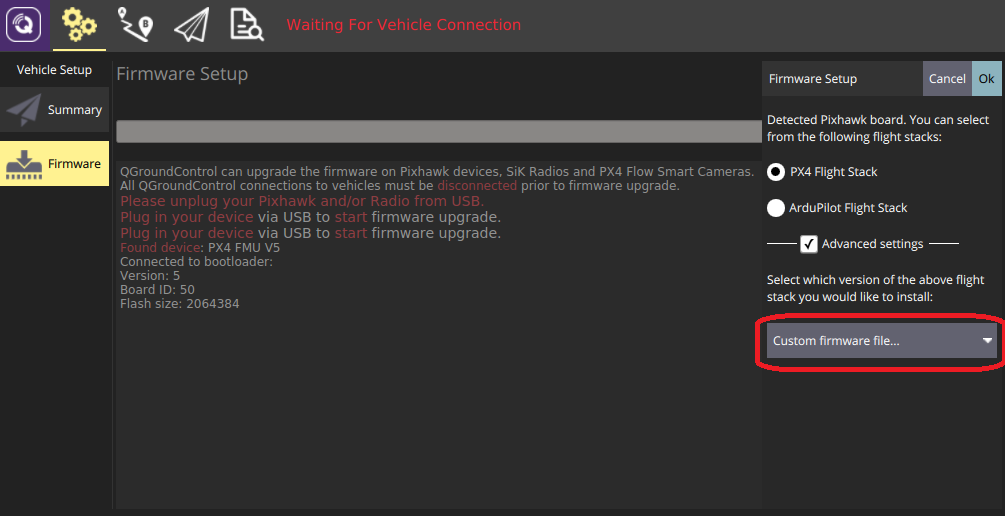
随后你将会被要求选择需要被载入的 .px4 固件文件(该文件是一个被压缩的 JSON 文件,文件内包含了机型的元数据)。
导航到构建文件夹然后选择相应的固件文件 (例如, Firmware/build/px4_fmu-v5_default/px4_fmu-v5_default.px4)。
单击 OK 开始载入固件。
- 重启 QGroundControl。
新的机型现在应可以在 QGroundControl 中进行选择了。